

In this post, I’m going to talk about collection of libraries that make up the OpenDeck platform, and why it’s important to really understand your code well.
Arduino
Before I start talking about Ownduino, I want to clarify what Arduino really is. Basically, it is an Atmel AVR microcontroller placed on a nice PCB with pin headers, combined with libraries that make the programming those chips so much easier, hiding away all the scary parts of embedded programming from user. Once you start dwelling into source code of most of the functions, you’ll find out that most of them have dozens of lines of code for performing really simple tasks, like reading the pins. But that is understandable, it’s the price you pay for convenience. After all, Arduino was never designed to give you the most of its hardware, it was designed to get you into the world of embedded programming really fast. What is not understandable is that most of Arduino code is really bad. Much of the code even goes against recommended approaches in Atmel ATmega datasheet, just take a look at serial functions. There is also a case of enabling many things by default, including lots of unnecessary code you don’t need most of the time. ‘You can’t manage something you can’t control’ is a nice thing I learned this year in college, and it applies perfectly here. Since I wanted to be in complete control over the code that runs on my platform, I created something called Ownduino. Not that creative name, but whatever.
Ownduino
Ownduino is a lightweight library which contains only few of most used functions from Arduino, like Serial.begin(), Serial.write(), millis() and a couple more functions. You can check out rest of the features on Ownduino GitHub. Ownduino also gives user a choice to completely disable ADC, timer or Serial buffer. digitalRead, digitalWrite or String class are examples of what you will not find in Ownduino.
MIDI library
For OpenDeck project I’m using modified Arduino MIDI library v3.2. I realize there is newer version available, but this one has worked flawlessly so far, and I don’t see that changing any time soon. However, I did modify it to more suit my needs. That’s the beauty of open source. Of course, all of the changes I made are published under OpenDeck GitHub repository. Most of the changes were pretty minor, like removing stuff I don’t need, and adding a option to enable or disable MIDI running status via MIDI System Exclusive.
MIDI running status issues
I do very little testing with Altmustech AU-123 MIDI chip, since I’m only using it in finished products (controllers I sell). Because of that, I recently run into some issues when enabling MIDI running status by default. Running status is great in theory, you can read more about it here. However, most MIDI equipment still has issues with it, and it’s best to leave it disabled if unsure what to do. Anyways, MIDI chip I’m using started to misbehave when I enabled it, and it really took me a while before I figured what was wrong, because the same code worked without issues when using serial to MIDI conversions. Reason why this didn’t work is because USB MIDI actually prohibits running status - I didn’t know about that until this had happened. Lesson: never assume things will work. If they do, then there is most likely something wrong. It’s the only constant in universe.
System Exclusive
Now this is a major issue, also discovered recently. It turned out that MIDI chip I’m using doesn’t really support MIDI SysEx, which means that with current OpenDeck setup, you are unable to configure anything using AU-123 - the core platform feature! Chip actually pretends it supports SysEx; it will gladly forward SysEx start and first byte after it, but it will also gladly ignore anything after first data byte, which renders its SysEx ‘support’ unusable. Not all is lost, however. I can still configure controller in emulated environment (virtual MIDI cable + HairlessMIDI + MIDI-OX), and because of this, I’m moving away from current ATmega328P setup to Arduino Pro Micro, with Atmega32u4 on it, which has USB support, so I can get rid of separate MIDI board.
Code optimizations
Recently, I’ve discovered that I can send real time MIDI data from Traktor Pro to a MIDI controller. MIDI data in question is track volume. You can send volume data to controller to turn the LEDs on and off, resulting in VU-meter. The problem with previous version of OpenDeck was that code was too slow. Code used too much time to read the potentiometers, which affected timing of column switching inside matrix and reading of MIDI input. Result of all that was that code was unable to catch all incoming MIDI data, so some LEDs would’ve stayed on when they don’t need to be, and vice versa.
Time interrupts
Thing I learned from this is that matrix switching should always be done inside a interrupt routine. It’s the only way of ensuring correct switching without any delays. Placing matrix switching inside interrupt routine was first thing I did to optimize the code. Second thing again boils down to knowing your code, something Arduino hides away from you.
ADC configuration
In order to explain what I did, it’s necessary to understand how ADC inside ATmega works. When converting analog signal to digital one, ATmega takes samples of input signal at a certain speed, derived from microcontroller clock sped (16MHz). In order to control this speed, there are couple of prescalers available (ATmega328p datasheet, page 256):
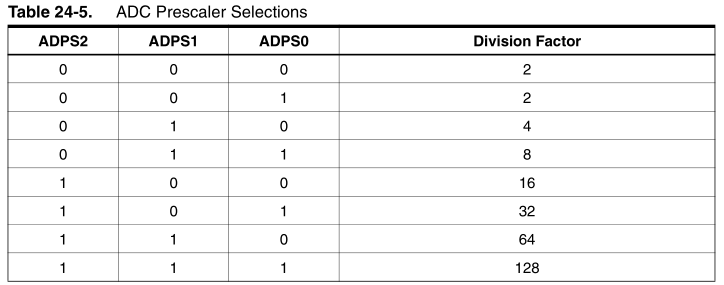
By default, Arduino uses prescaler 128, which means it runs at 125kHz. Since single ADC conversion takes 13 cycles, that gives us a sample rate of 9.6kHz. Note however, that pushing the ADC clock up to 1MHz doesn’t have much of an influence on 8-bit values, and since MIDI requires 7-bit resolution, there is no reason not to exactly that, that is, to set the prescaler to 32, giving us a sample rate of 38kHz, much faster than the default. Because of this, I included a setADCprescaler function inside Ownduino, to make it easier for me:
void setADCprescaler(uint8\_t prescaler)
{

    //disable ADC before setting new prescaler ADCSRA &= (0<<ADEN);
    switch(prescaler)
    {
        case 16:
        ADCSRA |= (1<<ADPS2)|(1<<ADEN);
        break;

        case 32:
        ADCSRA |= (1<<ADPS2)|(1<<ADPS0)|(1<<ADEN);
        break;

        case 64:
        ADCSRA |= (1<<ADPS2)|(1<<ADPS1)|(1<<ADEN);
        break;

        case 128:
        default: ADCSRA |= (1<<ADPS2)|(1<<ADPS1)|(1<<ADPS0)|(1<<ADEN);
        break;
    }
}
Now, we get much faster analog read-out, and 8-bit precision. If you consider that ATmega328P has 10-bit ADC, and that ATmega328P is 8-bit microcontroller, ADC value is obviously stored inside two registers: ADCH (2 higher bits) and ADCL (8 lower bits). We can easily discard two bits, so that we need only one register. To do this, we can invert places where ADC value is stored by using this line:
ADMUX |= (1<<ADLAR);
Now, analog value is in the range 0-255, and when reading the value, we simply read ADCH register, eliminating the need to read extra register. Divide it by two, and we get nice 7-bit value required for MIDI.
Conclusion
Together with doing matrix switching inside timer interrupt, code now performs much faster, and there are no more problems with sending lots of data to controller. You can check out VU-meter in action here:
So, in short:
- Never assume anything
- Know your code
That would be all.